
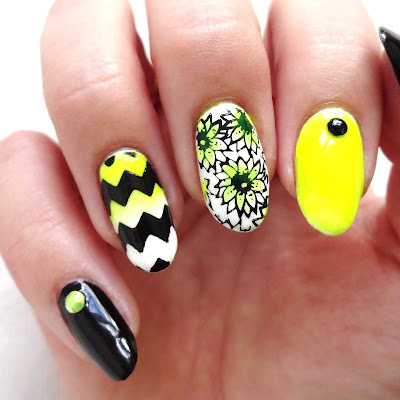
Last but not least, I give you Electric Daisy Girl...the last polish of the Crave The Rave Summer 2018 Collection by Artistic Nail Design.

This polish is the perfect sheer neon yellow...it looks exactly like a yellow highlighter!

Polish Used:
- Artistic Colour Revolution - Electric Daisy Girl
- Bundle Monster - Straight Up Black
- Wet N Wild - French White Creme
- Base and top coats
Other Supplies:
- Bundle Monster stamping plate - BM-XL112
- Stamper
- Makeup sponge
- Chevron nail vinyls
- Nail art brush
- Black round stud
- Iridescent yellow rhinestone
Last time, I did a black and neon gradient, so this time I'm trying a white a neon...still works, and still looks great. To create this look:
- Apply the base colors - pinky and thumb in black, the rest in white.

- Apply 2-3 coats of Electric Daisy Girl on the index finger and thumb. Then, use a wet makeup sponge to create a white and neon yellow gradient on the ring finger.

- Use black stamping polish to stamp flowers on the middle finger.

- Add chevron nail vinyls to the ring finger, and apply black polish with a makeup sponge. This helps keep the polish from seeping under the vinyls. Then quickly remove the vinyls.

- Use a nail art brush to add Electric Daisy Girl on the flowers.

- Add a black round stud to the base of the index finger. Add an iridescent yellow rhinestone to the base of the pinky, and two on the base of the thumb.


Black light effect still on point.


No comments :
Post a Comment