

Full-nail decals can seem intimidating, but they are fairly
easy to apply. Painting or stamping this kind of design would take ten times as
much effort and time.
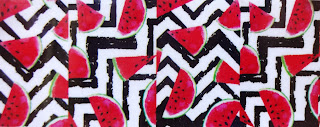 I received these watermelon decals from Born Pretty Store in
exchange for an honest review. The first and most important factor to note is
that the background is actually clear, not white as they appear on the sheet. I
assumed they were white, so I didn’t paint my nails, but it still looks cool
over plain nails with the negative effect. The watermelons are transparent, so
the decals will only work over light colors, and it probably pops the most over
white nails. Since these are full-nail decals, you have to be careful when
applying them that they don’t fold when you pick them out of the water. The
decals will mostly likely be too large for your nails, but the excess can be
easily melted away with some acetone on a nail art brush. If you use the acetone trick to melt the decals, be sure to
apply a layer of top coat first. This will help prevent melting away too much
of the design.
I received these watermelon decals from Born Pretty Store in
exchange for an honest review. The first and most important factor to note is
that the background is actually clear, not white as they appear on the sheet. I
assumed they were white, so I didn’t paint my nails, but it still looks cool
over plain nails with the negative effect. The watermelons are transparent, so
the decals will only work over light colors, and it probably pops the most over
white nails. Since these are full-nail decals, you have to be careful when
applying them that they don’t fold when you pick them out of the water. The
decals will mostly likely be too large for your nails, but the excess can be
easily melted away with some acetone on a nail art brush. If you use the acetone trick to melt the decals, be sure to
apply a layer of top coat first. This will help prevent melting away too much
of the design.
Polish Used:
- Sally Hansen Insta-Dri - Black to Black
- Matte top coat
- Watermelon decals
- Nail art brush
As I mentioned above, I was not aware that the decal
background was clear, so you may want to paint your nails white before applying
the decals (that was the look I had in mind before I started). To create this
look:
- Apply the decals on all the nails except the
ring finger. Paint the ring finger black.

- Add a layer of matte top coat to the black nail.

Don’t forget to use coupon code GHLQ10 for 10% off!


No comments :
Post a Comment