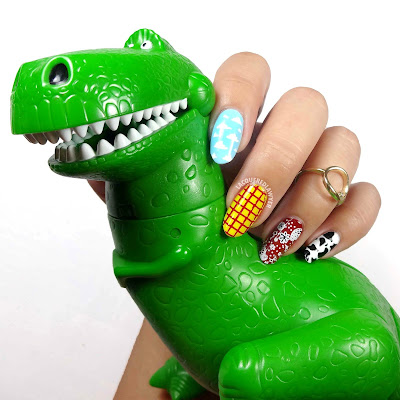
Having some fun with this Woody inspired nail art, from Disney and Pixar's Toy Story. Can you believe this movie came out 22 years ago?
Polish Used:
- Born Pretty stamping polish - red, yellow, light blue, brown, black and white
- Base and top coats
Other Supplies:
- Bundle Monster stamping plate - BM-222 (cow spots)
- Born Pretty Store stamping plate - paisley design
- Born Pretty Store stamping plate - QA95 (grid)
- Nail art brush
- Stamper
Normally I wouldn't use stamping polishes for base coats, but I was lazy. But, using a stamping polish can reduce the number of coats needed for full coverage. White and yellow polish, for example, tend to be a little transparent and can require multiple coats. Stamping polishes are very opaque considering the nature of stamping, so these do make good base color polishes when dealing with the lighter colors. To create this look:
- Apply the base colors - thumb in brown, index in light blue, middle in yellow, ring in red, and pinky in white.
- Use red stamping polish to stamp the grid pattern over the yellow on the middle finger. Use black stamping polish to stamp the cow spot design over the white on the pinky. Use white polish to stamp the paisley deign for the ring finger, and use the reverse stamping method to fill in some of the design with black like a bandanna print.
- Use a nail art brush to paint white clouds on the index finger.
- Use a nail art brush to paint "ANDY" with a backwards N on the thumb.


No comments :
Post a Comment