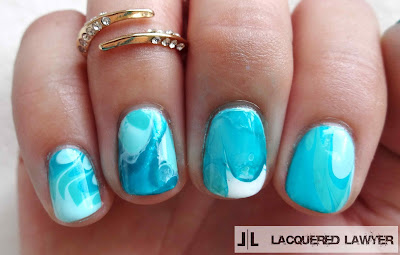
I love the look of water marbling, but it is not my forte. I definitely need to practice this skill the most. Since these nails didn't really turn out, instead of a tutorial, I'm going to discuss some things I learned while attempting to water marble.

1. Not all polishes are water marbling compatible.
I wanted a glitter polish in the marble, but it dried too quickly on the water. As a result, when I tried to create a marble design, the glitter section just bunched up and was stiff. The middle and ring finger were attempts with the glitter polish. However, I do like how the ring figure turned out, but for a gemstone nail as opposed to a marble. Now I'm not saying all glitter polishes cannot be used for water marbling. I have seen some really cool designs on Instagram incorporating glitter. The polish I used was very translucent with glitter, and I think the polish probably has to be more opaque or a holo, so there is more pigment as opposed to clear polish.
2. Colors are lighter when they spread.
On my index finger, I wanted some big swirls instead of the small ones like on my pinky. But because the polish is thinner when it is spread out, the distinction between the medium and the dark teal is hard to see. This isn't as big of an issue when using contracting colors, but for a monochromatic look like this, the colors blend together too much.
3. Don't forget to protect your skin. Unless you like a mess.
On my index and ring finger, I covered my skin with a layer of Aquaphor before marbling. The polish easy wipes off, plus the Aquaphor moisturizes. I forgot to do it on my other fingers, mostly because I was working one nail at a time, and so you can see how messy it is to clean up.

My pinky and thumb are the only two nails that turned out. Of course they were the last two that I did, so some trial and error finally resulted in decent nails. I definitely need to practice some more so all my nails can look like this.


No comments :
Post a Comment