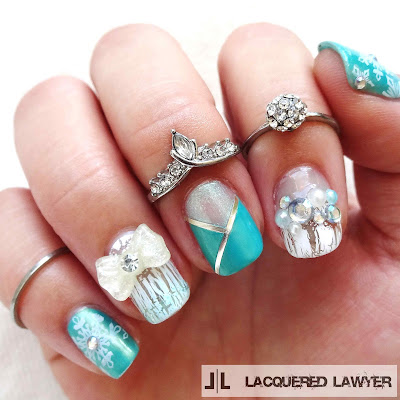
In case the summer weather was getting too hot for you, here are some icy nails to cool you down. Inspired by Disney’s Frozen, I channeled my inner Elsa to create this design.
My niece and nephew celebrated their 2nd birthday this past weekend (yes, twins!). The party was a Frozen Cars theme, for their current favorite Disney movies. You know I can't pass up an opportunity to paint some Disney nails, so here you go! :)

Polish Used:
- Nail Polish - Aqua (no name brand or color)
- NYC - 104A frosty light blue shimmer (color name sticker fell off)
- Kleancolor - Chunky Holo Teal
- Sally Hansen Crackle - Snow Blast
- Bundle Monster Stamping Lacquer - Angelic White
- Base and top coats
- Bundle Monster stamping plate - BM-H02 (snowflakes)
- Rubber stamper
- Silver nail tape
- Iridescent rhinestones, blue rhinestones, blue pearls, and white pearls
- Clear bow cabochon
- Krazy Glue
This design is similar to the Ice Queen one I did, but I added some aqua for Elsa’s coloring. To create this look:
- Apply the base colors – thumb and pinky in aqua, index and ring in Chunky Holo Teal, and middle in a frosty light blue shimmer by NYC.
- Using white crackle polish, paint the entire nail on the ring finger, and half the nail on the index finger.
- Add iridescent rhinestones to the centers of the snowflakes. Then add a mix of iridescent rhinestones and blue and white pearls across the index finger.
- Paint a chevron on the middle finger with aqua polish. Once dry, use silver nail tape to section it off. The tape should create a “Y” pattern.

- Apply a couple coats of Chunky Holo Teal to the tip of the ring finger to create a translucent gradient.
- Glue a glittery clear bow cabochon to the ring finger.


No comments :
Post a Comment